[Note: This is the second in a series of posts about automated workflows for email marketing. In part two, we look at the use of automation to create sophisticated drip campaigns. The examples used in these articles were created using Goolara Symphonie’s Automation features, but the information presented here is applicable to other systems as well.]
One of the simplest forms of automated workflows is an on-boarding campaign for a new client. In its simplest form, it goes something like this: Client A signs up for a product or service (let’s call him “Bob”), and thereafter receives regularly scheduled mailings instructing him in the ways he can use the product or service. Suppose Bob has signed up to use ABC Widgets SaaS inventory control system for his business. The first email he receives welcomes him to the service and explains all the advantages of ABC Widgets. The next mailing teaches him the basics of using the software. A few days later, he receives another email that might ask him to verify that he’s happy with the system and give him some more tips and ideas for using the software more efficiently. Finally, he receives a mailing with the information he needs to get help or move to the more advanced aspects of the system. In flowchart form, that might look something like this:
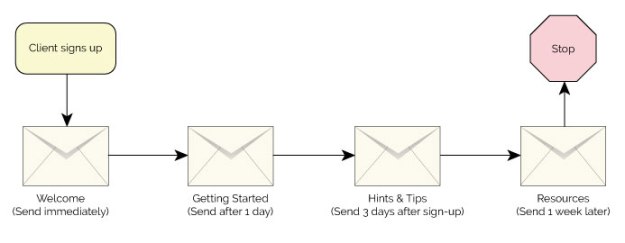
As you can see from the example above, the only automated aspect of this type of drip campaign is the starting point. After that, everything flows automatically based on the start date. In this respect, it is similar to a standard opt-in set-up, where a mailing is sent as soon as you sign up. Several email marketing software providers offer this particular style of drip campaign, and claim to offer automation, but true automation should offer much more than the ability to start a drip campaign at any given time. Full-featured email automation gives you the ability to get much more specific in what happens at each step along the way. For instance, you might want to branch out to two different results based on something that the client does or doesn’t do. For this, you’ll need to add logic to your automation.
Adding Logic
Suppose simply starting a drip campaign isn’t enough. Maybe you want to make sure that Bob implements the database in the ABC Widgets software as soon as possible. If Bob hasn’t started entering data into the database after a day or two, you’ll want to remind him of the importance of doing so, but you won’t want to remind him to do this if has already done it. Nobody likes to receive a notice like that, and it doesn’t make you look good with Bob either. To do this properly, you’ll need to add a logic point (also called a decision point) to your workflow that looks at Bob’s use of the software and offers different mailing choices based on that information. Here is the same drip campaign shown previously, but a decision point added to the workflow:
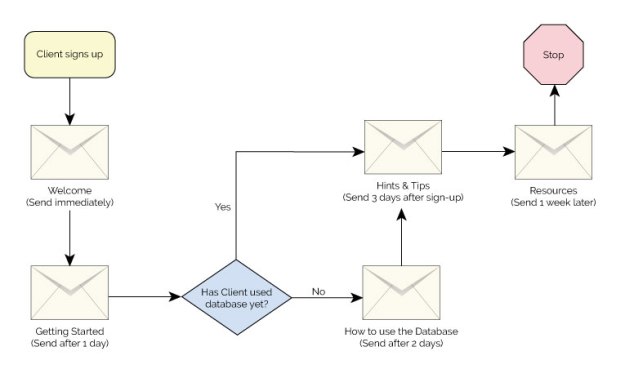 In our example, the decision point is a yes or no choice, in some software, that’s all you get. With some email marketing software, (such as Goolara Symphonie), you are not limited to this simple yes or no choice. You can branch the decision point in into as many alternative paths as you’d like. You might, for instance, offer multiple paths based on each recipient’s membership level, with each level receiving a different set of mailings.
Time Controls
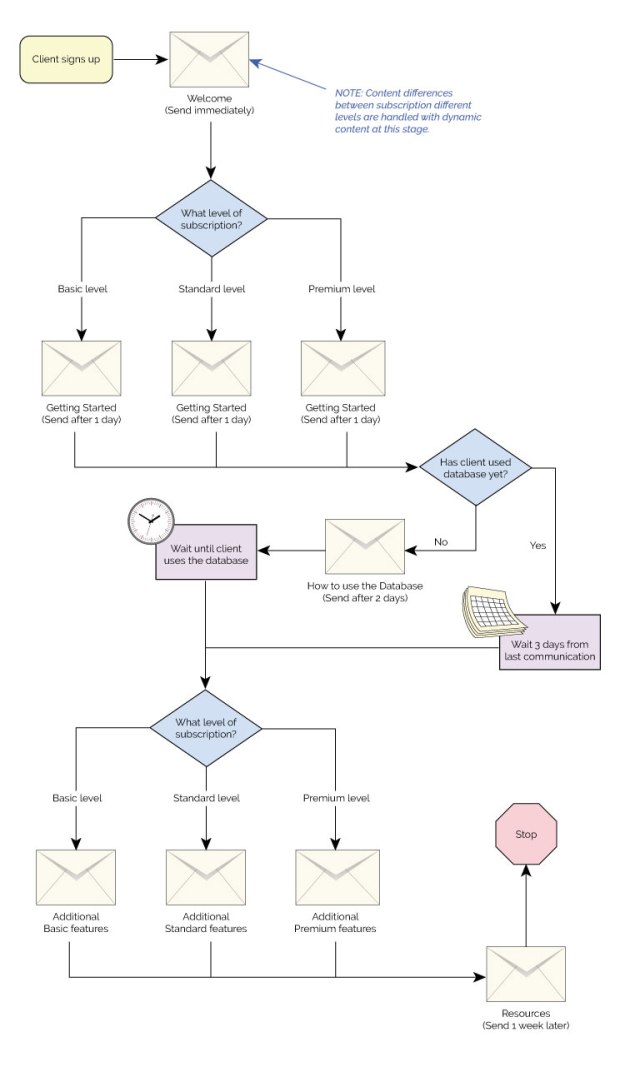
You can also add additional trigger points that are activated when the client takes specific actions. These are in the form of “wait until” commands that come into play when the recipient makes a specific choice, such as clicking or opening certain pages. In our example, ABC Widgets could notify Bob when he finally does use the database feature, and offer additional tips and instructions after that. There’s no reason this couldn’t be an on-going set-up, with new information and suggestions being provided at different points during the on-boarding procedure and after.
Similarly, you can set up delays that are triggered based on their proximity to specific dates, such as birthdays or membership anniversaries. In our example, ABC Widget may want to notify Bob toward the end of a three-month trial period, or before the annual membership is due. These dates will be different for every client, which makes them ideal candidates for automation.
Split Test, Write Fields, and More
Other possible automation nodes include A/B splits, which is useful for split testing that requires different levels of interaction; write fields, which lets you completely change the content of each mailing based on any data you wish; and jump points, which are primarily used to help keep complicated workflows easy to manage. Not all ESPs offer all these features, but these represent a few of the more common nodes that you’ll encounter with advanced email marketing software.
Now let’s look at our original on-boarding campaign with a few more features added. In the example below, we’ve split the mailings into three different paths based on the subscription level for each client. The automation checks the subscription level, offers the correct email, looks at the actions of the client and proceeds with the automation based on whether or not the client has implemented the database. You could also set this up so that each of the three membership levels receives a completely different set of mailings for every step, but in our example, we’ve used dynamic content to change the data in the first and last mailings, allowing us to consolidate those two mailings. For more on dynamic content see the previous post, Personalizing Your Email Marketing.
 If you are new to automation, you should start with a simple workflow and develop more complex ones as you get more familiar with the tools. One thing to be careful about is adding new functions to an existing automation. This is certainly acceptable and even preferable in many circumstances, but you’ll want to use email marketing software, such as Symphonie, that will flag possible recursive operations (operations that endlessly loop back on themselves) to make sure that your automated email workflows run smoothly.
Next: Part Three—Creating an Event-based Email Campaign